
For off-road enthusiasts, the thrill of tackling challenging terrains at night is irresistible. But navigating uncharted paths safely requires more than just guts and good tires; it necessitates the right lighting. Off-road lights are essential gear that can drastically boost your visibility during late night jaunts and weekend adventures. This detailed guide empowers you to choose the right types of lights, select optimal mounting locations, and confidently tackle wiring and installation. With the right setup, you’ll illuminate your path ahead, transforming your truck into a beacon of adventure and safety in the darkest of hours.
null

null
Strategic Mounting: Choosing Mount Points That Maximize Visibility, Safety, and Legality for Off-Road Truck Lighting

When you set out to equip a truck with off-road lights, the mounting locations you choose are more than just a matter of aesthetics. They define how effectively you can see the trail, how other road users perceive your vehicle, and how durable your setup will be in the rough and tumble of remote landscapes. A thoughtful mounting strategy starts with the realities of your typical environment—rocky corridors, desert washes, dense brush, or open desert highways—and then translates those needs into practical, balanced placements. It also requires a clear-eyed assessment of how each spot will affect the truck’s aerodynamics, weight distribution, and accessibility for maintenance. The goal is to create a lighting system that feels unobtrusive until you flip the switch, yet capable of meeting specific challenges when darkness falls and trails demand more than your factory headlights can offer. In practice, this means weaving together the practical benefits of each mounting zone with the realities of operation, legality, and vehicle integrity so that every light has a purpose and every purpose aligns with a broader safety framework.
Front bumper area remains one of the most practical and popular choices for mounting off-road lights. Positioning lights on or near the bumper allows the beam to illuminate the immediate terrain in front of the tires—an advantage when negotiating uneven rock gardens, potholes, or washouts where precise footwork matters more than distance alone. The proximity of these lights means you can react quickly to obstacles that appear just ahead, and their maintenance is typically simpler, with easier access for bulb checks and harness inspections. However, this location also limits the range, so it’s best understood as the backbone of a multi-layered lighting plan rather than the sole source of vision in open terrain. When you use this area, you naturally tend toward a combination approach: a set of smaller lights dedicated to close-range ground contact, paired with higher-throw units that extend your overall reach without crowding the field of view.
To optimize this zone without creating glare for oncoming traffic, avoid mounting above the factory headlights. The risk of blinding other drivers is real and, in many jurisdictions, illegal. Instead, aim for a configuration that produces a clean, low-angle wash over the ground ahead. If you are unsure how to balance the beam pattern, a simple heuristic is to direct the main forward throw slightly downward so the bright center of the beam hits the road surface rather than the windshield of approaching vehicles. It’s a small adjustment with a meaningful impact on safety and legality, and it reinforces a broader principle: lights should extend your awareness without creating new risks for others. This is where the discipline of mounting becomes a form of collaboration with the road rather than a display of power.
Beyond the bumper, the A-pillars or hood edges offer a natural extension for lateral and forward coverage. Placing lights here helps fill the gaps between the bumper and the main headlights, improving side visibility during cornering and on uneven banks where the line of travel shifts. This positioning can enhance your perception of moving obstacles that might otherwise be hidden by the vehicle’s silhouette, such as low-slung rocks or a hedge of vegetation hugging the trail edge. The key with these placements is adjustability. Because terrain and trail lines vary, being able to pivot or re-aim a handful of lights can dramatically improve coverage without increasing beam intensity across the entire field of view. It’s a small investment in flexibility that pays off when you encounter off-camber sections or serpentine sections where a fixed, single-beam approach falls short.
Roof-mounted light rigs remain the domain of long-range planning and high-altitude ambition. When you’ll spend hours crossing featureless dunes or navigating broad, unpopulated valleys, a roof or roof rack setup can deliver a sweeping, high-angle view that carries far into the distance. Mounted near the front of the roof, the beam pattern clears the hood line and climbs above the driver’s horizon, giving you a clearer glimpse of far-off trail markers, animal movement, or fallen debris that might lie ahead. The upside is unambiguous: more time to respond, better anticipation of upcoming turns, and a sense of security when visibility is paramount. The downsides, however, are real and practical. Roof-mounted lights add weight to the roof line, increase aerodynamic drag, and can contribute to wind noise and fuel economy penalties on longer trips. They also sit higher on the vehicle, which makes them somewhat more vulnerable to damage from low-hanging branches or overhanging brush in narrow passages. If you choose this zone, balance is essential. Use lighter bar-style configurations or smaller pods and avoid overloading the rack. The goal is to supplement other zones, not to overwhelm the truck’s structure with heavy, wind-catching hardware.
Side-mounted lights—whether on fenders or the lower edge of step rails—offer a different and crucial advantage: enhanced lateral awareness. Narrow or winding trails demand a sharp sense of what lies just off the line of travel. Side-mounted units illuminate the edges of the trail, helping you avoid scrapes with rocks, roots, or curb-like obstacles that can slap a wheel or damage a tire before you’re fully aware of their presence. The flip side is exposure to debris and the potential for damage from kicks of mud, rocks, or brush. If you run these lights, you’ll often want to consider rugged seals and protective covers or housings, along with a plan for quick replacement if an impact occurs. The lateral perspective also increases the chance of glare in the side mirrors, which can distract the driver. Position and angle with care, ensuring a clean, focused beam that brightens the trail’s edge without spilling into the driver’s field of view or into adjacent lanes during highway use.
Rear-mounted lights are a practical asset for reversing in the dark, backing into campsites, or navigating tight corridors where the trail repeats behind you. A well-placed rear fixture can illuminate the approach to a campsite, reveal obstacles around the vehicle’s tail, and reduce the need to shuffle and guess when backing through a dense forest or a rocky turnout. Because these lights face away from oncoming traffic, glare is less of a concern, but you still want to avoid creating a bright halo that unsettles drivers behind you. It’s wise to aim rear lights with a slight downward bias to reduce sky glare on clear nights and to help you judge the distance to trailing vehicles. There’s a practical synergy here: rear lighting often pairs well with backup cameras and sensors, providing a safer, more controlled shut-down sequence when you’re parked in unfamiliar terrain after dark.
A growing portion of modern installs nests lights under the headlights or integrates light outputs into the grille region. This approach can yield a clean, factory-like aesthetic and a beam pattern that remains aligned with the main headlights. The architecture of such a setup requires careful attention to heat management and airflow, ensuring the added fixtures don’t disrupt cooling or create hot spots near the engine bay. If you pursue this route, you’ll want to verify that the light assembly does not interfere with radiator airflow or block essential components. The guiding principle across all these locations is not novelty but reliability: wherever you mount, you must preserve the vehicle’s function and safety while expanding its perception on the trail.
With each mounting zone, the decision hinges on two practical questions: How will this spot contribute to overall coverage, and will it stay durable under the conditions you face? The best approach is to treat mounting as a system rather than a collection of individual placements. A coherent plan borrows the strengths of several zones and distributes the load in a way that minimizes blind spots and avoids redundant overlap. It also means planning for the future—anticipating how changes in your typical routes might demand repositioning or upgrading components. In this sense, the mounting decision becomes a forward-looking discipline, one that respects both the vehicle’s integrity and the people who share the road with you.
A foundation from the mechanical side is essential. The act of mounting lights, routing cables, and aligning beams depends on base skills that keep everything secure and reliable. You’ll benefit from a methodical approach to the mounting process, starting with a careful layout, including measured distances and mock positions on the vehicle. A well-planned layout reduces the need for repeated drilling or remounting, limits wire runs, and makes service easier. It also keeps the vehicle’s exterior silhouette clean, preserving aerodynamics and minimizing snag hazards on dense trails. Those who commit to a thoughtful plan often find the installation smoother and quicker, with less fiddling and rework.
In the spirit of building a robust system, consider the line from practical mechanics to field-tested behavior. A strong mechanical base helps ensure that tightening hardware remains secure after a rough descent, a rain-drenched river crossing, or a dust-filled night on a canyon rim. This is where the value of a steady, informed approach becomes evident: it prevents the need for frequent adjustments and reduces the risk that vibrations or repeated impacts loosen the fixtures. The result is a mounting plan that stands up to both the routine wear and the unpredictable challenges of off-road travel, keeping you visible and safe without demanding constant maintenance.
As you map these zones, a holistic mindset matters. Weigh the weight each light adds against the truck’s payload and suspension dynamics. Consider the practicalities of cable routing: you’ll want to keep harnesses tucked away, secured to solid anchor points, and protected from heat, water, and road grime. Grounding should be solid to minimize electrical noise and the risk of corrosion. Finally, confirm that your beam distribution aligns with the intended use: a blend of spot and flood patterns without creating dangerous gaps in the field of view. When you begin to pull all these threads together, you’ll see that choosing where to mount is less about chasing the latest configuration and more about crafting a coherent narrative of illumination that supports safe, confident driving—whether you’re negotiating a backcountry canyon or cruising a remote desert road.
For readers who want to connect mechanical preparation with mounting philosophy, a grounded reference path can be found in broader maintenance literature, such as the kind of rigorous guidance discussed in the chapter on mastering-diesel-mechanics-your-step-by-step-path-to-success. That material emphasizes the linkage between a vehicle’s core systems and any add-on equipment, reminding us that a secure mounting strategy starts with a solid foundation in the basics of diesel maintenance, electrical integrity, and component compatibility. By anchoring your mounting decisions in that same disciplined framework, you’ll build a system that not only looks purposeful but also endures the demands of rugged environments.
In the end, the best mounting plan isn’t a single best spot; it’s a balanced map that leverages the strengths of multiple zones. It respects safety and legal constraints, keeps the vehicle’s performance characteristics intact, and yields a practical, predictable lighting profile. When you follow this approach, your off-road lights behave as a well-integrated partner on the trail—quietly effective, easy to service, and aligned with the realities of real-world driving rather than a fantasy display. The result is a system that reduces uncertainty in the dark, enhances your situational awareness, and keeps you focused on the road ahead rather than worrying about the setup itself.
For further exploration of the practical aspects of beam management and a deeper dive into optics, you can consult the official guidance on advanced light systems, which provides detailed information on beam patterns and performance optimization. External resource: official Solis Series optics guidance
Internal link: A solid mechanical foundation, much like what you’d learn in mastering-diesel-mechanics-your-step-by-step-path-to-success, underpins any mounting strategy. This cross-reference reinforces how integral sound maintenance and electrical discipline are to a mounting plan that lasts through multiple seasons of use.
Wiring and Electrical Safety: Building a Reliable Power System for Your Truck’s Off-Road Lights
Wiring and Electrical Safety: Building a Reliable Power System for Your Truck’s Off-Road Lights
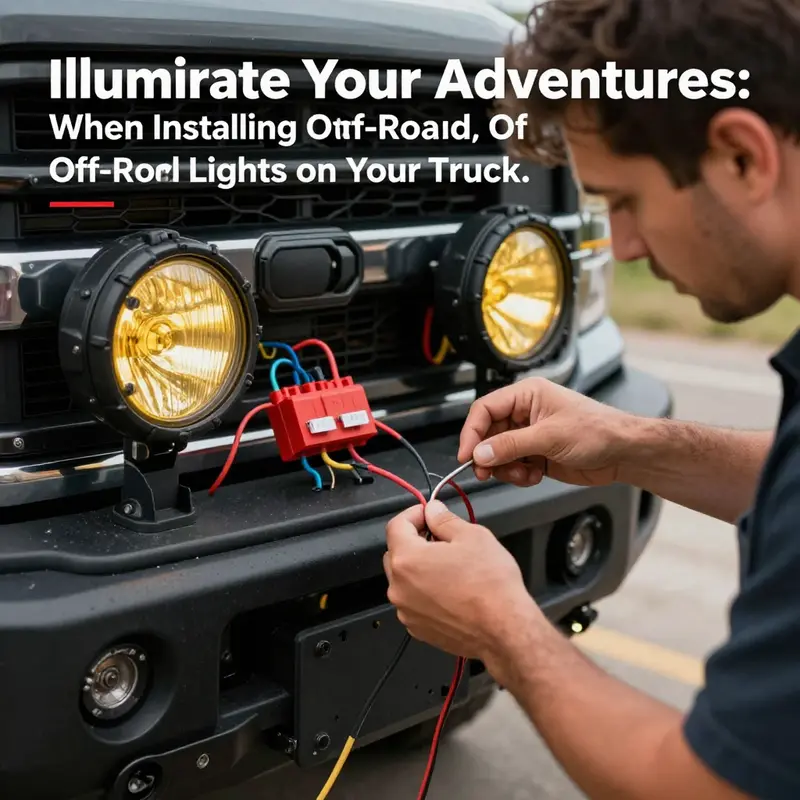
Installing off-road lights transforms a truck’s nighttime capability, but the lights are only as good as the electrical system that feeds them. Poor wiring leads to dim or flickering beams, melted connectors, blown fuses, or, in worst cases, vehicle fires. This chapter walks through the practical choices and safe practices that create a durable, serviceable lighting system. Read it as a single workflow: plan, protect, install, test, and maintain. Each step reduces risk and extends the life of your installation.
Start with planning. Calculate the total current draw of every light you intend to run at full power. Add a modest margin—20% is a sensible buffer—to cover inrush currents and future upgrades. Use that figure to choose wire gauge, fuse sizes, and relay ratings. For most LED-based off-road lights, 10–12 AWG wire works well for individual runs. Heavier bars or multiple pods grouped on a single circuit may require 8 AWG. Always select wire manufactured for automotive use, with UV resistance and insulation rated for exposure to heat, oil, and abrasion.
Before touching any wiring, disconnect the battery. This simple safety measure prevents accidental shorts and protects sensitive electronics. Work with the negative terminal first. Keep a small parts tray for bolts, washers, and connectors so nothing falls into the engine bay. Wear eye protection and insulated gloves when routing wires near the battery and alternator.
Routing wires correctly is a building block of long-term reliability. Follow existing wiring harnesses where possible. Run cables along the frame rails, under door sills, or behind trim panels. Use protective conduit or split loom tubing where wires cross sharp sheet metal or move alongside suspension components. Secure runs every 6–12 inches with UV-rated zip ties and avoid heat sources such as exhaust manifolds and turbochargers. When passing through the firewall or any bulkhead, use rubber grommets to prevent chafing and to seal against moisture.
Connector choice and waterproofing matter as much as wire size. Crimp-style terminals installed with a quality ratcheting crimper outperform cheaper pliers-crimped joints. Solder can be used for extra security, but heat-shrink tubing with an adhesive lining is essential to seal the joint. For external connections exposed to mud or water, use fully sealed connectors or potted inline connectors. Apply a thin veil of dielectric grease inside connector shells to deter corrosion and to ease disassembly later.
Grounding often gets overlooked, but it is crucial. Each light or pod should have a reliable negative return to the vehicle chassis. Use a short, heavy gauge ground wire and bolt it to a clean, bare-metal surface. Scrape away paint and rust, and use a star washer to bite into the metal. Consider running grounds back to a bus bar if you are installing multiple lights; this centralizes connections and simplifies troubleshooting. If you experience dim lights or intermittent operation, re-check grounds before any other component.
Fuse protection is non-negotiable. Place an appropriate inline fuse within a short distance of the battery—typically within 18 inches. Sizing the fuse requires knowing the continuous current draw of the circuit. Choose a fuse rated slightly above the continuous draw but below the maximum safe capacity of the wiring protecting that circuit. For instance, a circuit that draws 20 amps continuously should use a fuse rated around 25–30 amps, paired with wire sized for that current. Use fuse holders rated for the environment and mount them in a protected location.
Relays perform three jobs: they allow a small dashboard switch to control high current loads, they reduce voltage drop by keeping heavy currents near the battery and lights, and they protect the vehicle’s OEM wiring from overload. Use automotive-grade relays rated above the circuit’s maximum current. For most off-road light circuits, sealed 40–60 amp relays work well. When wiring the relay, run the relay coil to an ignition-switched feed if you want the lights to operate only with the key on, or to a constant feed when you need always-on capability. Always include a fuse between the battery and the relay.
Switches should be mounted in accessible but protected locations. Use switches rated for the load they control, factoring in any relay coil current if the switch directly energizes the relay. Many setups use a single multi-gang panel to control different banks of lights—spot, flood, and amber fog, for example. Label each switch clearly. For stealth and safety, install a separate master enable switch or a keyed disable for high-power spotlights to prevent accidental operation.
When multiple lights are installed, organize them into logical circuits. Group lights by function and by location to limit wire length and to simplify troubleshooting. For a typical setup, separate the roof bar from bumper pods, and run each group on its own fused circuit. If power runs are long, use thicker wire to limit voltage drop. A voltage drop greater than 10% can noticeably dim LEDs and reduce efficiency.
Secure mounting hardware contributes to safe electrical systems. Battery terminals, fuse holders, and distribution blocks should be firmly fastened and protected from vibration. Use nylon lock nuts or thread locker on bolts that may loosen with vibration. Place distribution blocks in locations that avoid direct water spray and road debris. If a distribution block is used, ensure each branch is fused individually.
Testing is systematic. With the battery reconnected, check each circuit with a multimeter before switching on the lights. Confirm proper voltage at the fuse, at the relay output, and at the lamp harness. Energize each circuit one at a time. Observe operation for several minutes and feel connectors and relay bases for excessive heat. Heat is a warning sign—identify and correct the issue before leaving the vehicle unattended. Check for intermittent operation while the vehicle is running to confirm alternator and regulator compatibility.
Document the installation. Take a photo or sketch of wiring runs and note fuse sizes and relay part numbers. Label wires inside the cab with heat-shrink labels or tape. This record speeds future repairs and helps comply with inspection or warranty requirements.
Maintenance keeps the system healthy. Inspect connectors and grounds seasonally and after off-road events. Look for corrosion, chafed insulation, or signs of overheating. Tighten battery terminals and distribution block screws periodically. Replace fuses only with the correct type and rating. If a fuse blows repeatedly, diagnose the fault instead of using a higher-rated fuse.
Address common failure modes proactively. Corrosion at connectors leads to high resistance and heat; treat it with proper cleaning and sealing. Voltage drop at long runs produces dim lights—verify gauge and shorten runs when possible. Relay chatter often traces to poor coil voltage or a weak ground—inspect switch wiring and grounds. For persistent problems, isolate the circuit and test each component independently.
Safety extends beyond the wiring itself. Avoid mounting lights where they will directly dazzle oncoming traffic. Use covers or angle fixtures to reduce glare while driving on public roads. Do not tie new lighting circuits into thin, factory headlight wiring or into circuits controlled by the vehicle’s body control module. OEM wiring often cannot handle additional loads and may complicate diagnostics.
Finally, use a harness when available. Purpose-built wiring harnesses for off-road lights include relays, fuses, and sealed switches. They reduce installation time and lower the risk of mistakes. When fabricating your own harness, mirror the professional approach: short, neat runs; secure mounting; correct gauge; and proper environmental protection.
For a practical reference on routing wires through pods and mounting considerations, see the step-by-step roof light wiring guide available online: https://www.instructables.com/Off-Road-Truck-LED-Cab-Roof-Light-Install/.
For broader vehicle electrical safety context and related industry safety discussions, consult this internal briefing on a notable electric vehicle safety concern: Orange EV Husk E recall safety concerns.
Follow these practices and your off-road lights will be reliable, serviceable, and safe. Proper wiring is invisible until it matters. When it does, a thoughtful installation keeps you on the trail and out of the repair shop.
null

null
Final thoughts
Equipping your truck with off-road lights enhances your nighttime adventures while prioritizing safety on rugged paths. Each element, from choosing the right type of lights to ensuring meticulous installation, contributes to creating a reliable illumination system tailored for your specific needs. By following this guide, you can be assured that your setup will illuminate your trails effectively and safely. Encourage others who share your passion for adventure to invest in high-quality gear—after all, it’s not just about having fun; it’s about having the necessary tools to enjoy those adventures responsibly.