
Introduction: Embracing Adventure with Olive Green Off-Road Trucks
For the passionate off-road enthusiast, every journey is an adventure waiting to unfold. Customizing your truck is not just a matter of aesthetics; it’s an expression of personality and individuality that resonates with the ruggedness of off-road exploration. Among the myriad of color options available, coating your off-road truck in a bold olive green stands out as a choice steeped in character and adventure. This unique hue not only pays homage to the great outdoors, evoking the lush forests and vast landscapes but also offers practical benefits for those who dare to tread beyond the beaten path.
An olive green coat acts as a versatile backdrop for various terrains, providing both camouflage and style. When you’re maneuvering through dense foliage or rocky landscapes, this color can help your vehicle blend in, minimizing the stark contrasts that attract attention. Moreover, an olive green truck can symbolize a connection to nature, aligning with the consciousness of eco-friendly practices embraced by many adventurers today. In addition to its striking appearance, this color choice is often associated with durability and resilience, akin to the vehicles rugged enough to traverse the wildest terrains. So, get ready to delve into the world of off-road truck customization, exploring how an olive green coating can transform your vehicle and enhance your adventures.
Essential Tools and Materials for Coating Your Off-Road Truck Olive Green
Coating your off-road truck in an olive green hue not only enhances its rugged look but also protects it from the harsh elements of outdoor adventures. Here’s a comprehensive list of essential tools and materials needed for the job:
Tools
- Sandpaper (various grits): Use 80, 120, and 220-grit sandpaper to prepare the truck’s surface for painting.
- Paint Sprayer or Spray Cans: A high-quality paint sprayer provides a smooth finish, but quality spray cans can also do the job effectively.
- Paint Roller and Tray: Useful for larger surface areas where a sprayer may not reach.
- Masking Tape: Ensure clean lines and protect areas that shouldn’t be painted.
- Drop Cloths or Plastic Sheeting: Protect the ground and surrounding areas from paint drips.
- Wire Brush: Remove rust or old paint from the truck’s surface.
- Paint Scraper: For peeling off old paint and preparing surfaces.
- Respirator Mask: Safety first! Ensure you’re not inhaling paint fumes.
- Safety Goggles: Protect your eyes while sanding and painting.
- Gloves (Nitrile or Latex): Keep your hands clean and safe from chemicals.
Materials
- Olive Green Automotive Spray Paint: Choose a durable paint designed for vehicles, ideally with a matte finish for a rugged look.
- Primer: Use a good quality automotive primer for better adhesion and longevity of the paint.
- Clear Coat: Protect the paint job and add a shine; choose a UV-resistant product for longevity.
- Degreaser/Cleaner: Clean the surface thoroughly before painting to ensure optimal adhesion.
- Rust Inhibitor: If your truck has any signs of rust, treating it with a rust inhibitor before painting is crucial.
Additional Considerations
- Always read the manufacturer’s instructions for all products used and follow safety precautions. For more in-depth guidance on truck modifications and maintenance, check out our article on mastering diesel mechanics.
By gathering the listed tools and materials, you’re well on your way to transforming your off-road truck into an olive green beast that’s ready to tackle any terrain. Good luck, and enjoy the satisfying process of making your truck truly yours!
Step-by-Step Guide to Coating Your Off-Road Truck Olive Green
Coating your off-road truck in olive green not only enhances its rugged aesthetic but also protects it from the elements. Here’s a detailed, authoritative guide to help you through the entire process.
Preparation Steps
Before you begin the coating process, adequate preparation is key to achieving a long-lasting finish.
- Clean the Surface
- Start by thoroughly washing your truck. Use soap and water to remove dirt and grime. For stubborn spots, a degreaser or a specialized automotive cleaner can be effective.
- Ensure the surface is completely dry before proceeding to the next step.
- Sand the Surface
- Use medium-grit sandpaper (around 200-grit) to sand the entire area that will be coated. This roughens up the surface, helping the coating adhere more effectively.
- Pay special attention to any rust spots or imperfections, and sand those areas down to bare metal if needed.
- Masking
- Use painter’s tape to cover areas that should not be coated, such as the windows, lights, and tires. This will help prevent overspray and keep your coating neat.
- Consider putting down a drop cloth or newspaper around the work area to catch any drips or overspray.
Application Steps
Once your truck is prepped, it’s time to apply the coating. Choose the right coating based on your preferences and the vehicle’s needs.
- Choose the Coating Type
- Popular choices include eco-friendly sprays, automotive paints, or rubberized truck bed liners. If you aim for a durable, textured finish, a bed liner may be ideal. For a sleek look, a high-quality automotive paint is recommended.
- Ensure that the product is suitable for the exterior of your vehicle and provides UV protection if exposed to sunlight.
- Mix the Coating
- If your selected coating requires mixing (as is common with two-part products), follow the manufacturer’s instructions carefully to ensure proper consistency and adhesion.
- Apply the Coating
- Using a spray gun or roller, apply the coating evenly in light, consistent strokes. Work in manageable sections to avoid the coating drying before you can even it out.
- Maintain a distance of 6-12 inches from the surface to avoid drips and ensure even coverage. Multiple thin coats are better than one thick coat for achieving a smooth finish.
Finishing Steps
Once you’ve applied the coating, it’s time to let it cure and finalize the project.
- Curing
- Allow the coating to cure according to the manufacturer’s guidelines. This can often take several hours to a few days, depending on conditions like temperature and humidity.
- Ensure the vehicle is in a well-ventilated area during the curing process.
- Inspect and Touch Up
- Once the coating has cured, inspect the entire surface for any inconsistencies or missed spots. If you find any, use a fine brush to touch them up.
- Ensure to blend these areas in with the surrounding coating for a uniform look.
- Final Cleanup
- Carefully remove all masking tape and clean any overspray with a gentle solvent, being careful not to disturb the fresh coating.
- Step back and admire your work!
Additional Tips
- For even better results, consider applying a clear protective coat over the olive green base, especially if you plan to expose your truck to harsh conditions.
- Always work in a well-ventilated area and wear appropriate safety gear, including gloves and a mask, to protect yourself from fumes and particles.
Now that you’re ready to coat your off-road truck, you can enjoy the rugged style and added protection it offers. It’s an investment in both aesthetics and durability! For more tips on truck maintenance and modifications, check out our guides on mastering diesel mechanics and benefits of fleet management.
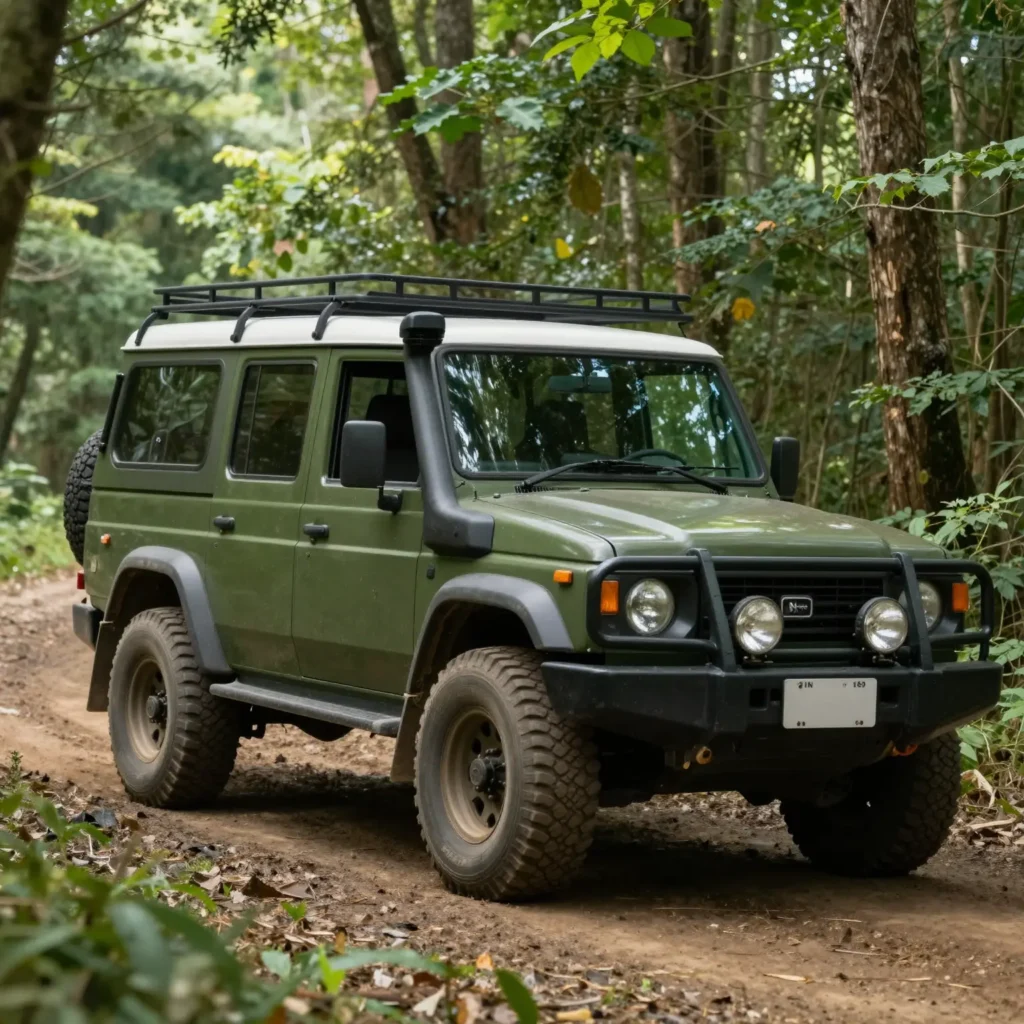
The image captures an olive green off-road truck undergoing a meticulous coating process in the heart of nature’s rugged beauty. Set against a backdrop of picturesque rocky terrain and clusters of tree foliage, the scene exudes the spirit of adventure and outdoor exploration. The truck, sturdy and muscular, is in the midst of being coated, reflecting the intense focus of the individual working passionately on it. This person, dressed in protective gear, showcases their commitment to both the craft and their love for off-roading. The sunlight streams down, illuminating the vibrant truck and the surrounding landscape, creating an atmosphere filled with enthusiasm and dedication. Every detail in the image tells a story of preparation for exciting off-road journeys ahead, making it a perfect depiction of the off-road enthusiast’s world.
| Paint Type | Durability | Price Range (per gallon) | Finish Type |
|---|---|---|---|
| Acrylic Enamel | Moderate | $20 – $40 | Glossy, Semi-gloss |
| Urethane | High | $30 – $100 | Glossy, Matte |
| Polyurethane | Very High | $50 – $150 | Glossy |
| Epoxy | Extremely High | $70 – $120 | Glossy, Satin |
| Lacquer | Low | $15 – $30 | Glossy |
Summary of Paint Types for Off-Road Trucks
- Acrylic Enamel:
- Durability: Offers moderate resistance to scratches and fading.
- Pricing: Budget-friendly, making it a popular choice.
- Finish: Available in glossy and semi-gloss, providing visually appealing options.
- Urethane:
- Durability: Known for its high durability, especially against UV rays and chemicals.
- Pricing: Mid-range pricing makes it a decent compromise between cost and quality.
- Finish: Typically high gloss, enhancing the truck’s appearance.
- Polyurethane:
- Durability: Very high, suitable for heavy-duty trucks exposed to harsh conditions.
- Pricing: A premium option, justified by its longevity and toughness.
- Finish: Usually glossy and enhances color retention.
- Epoxy:
- Durability: Extremely high; often used as a primer or base coat for its toughness.
- Pricing: Higher end of the scale due to its superior properties.
- Finish: Generally glossy to provide a strong protective layer.
- Lacquer:
- Durability: Low durability, tends to chip and fade faster than other options.
- Pricing: Affordable, which can be attractive for DIY projects.
- Finish: Glossy, but may require frequent reapplications.
This table offers a quick reference for off-road enthusiasts looking to coat their trucks. For more in-depth coverage on paint types and applications, feel free to explore learn more about the automotive industry.
When it comes to off-road trucks, selecting the right paint is crucial for achieving a rugged look while ensuring longevity against harsh elements. Here are some leading brands to consider:
1. Krylon COLORmaxx
Krylon COLORmaxx is popular among off-road enthusiasts for its versatility and ease of use. This paint provides a satin olive green finish and has built-in primer, making it optimal for DIY projects. It offers:
- Durability: Resistant to chipping and fading.
- Application: Easy spray application that dries quickly.
- Color Options: Available in various shades, including olive green.
For more information on paint options, check out the Krylon product details.
2. Eastwood
Eastwood is known for its high-quality automotive paints, including dedicated options for off-road vehicles. Their products are formulated to withstand tough conditions:
- Durability: Resists UV rays and harsh environmental conditions.
- Color Selection: Offers pre-mixed kits, specifically in a shade labeled “Battlefield Olive,” perfect for off-road aesthetics.
You can explore more about Eastwood’s offerings here.
3. Custom Shop Olive Drab Green Paint Kits
Custom Shop’s Olive Drab Green paint kits are specially designed for both cars and trucks, making them a favorite among off-roaders:
- Performance: Known for excellent adhesion and resistance to elements.
- Color: Specifically tailored to provide a deep olive green that enhances the aggressive look of off-road vehicles.
For detailed insights, visit Custom Shop’s Olive Drab offerings.
4. Scorpion Coatings
Scorpion Coatings provides advanced paint protection options, particularly focusing on durability. Their coatings include:
- Kevlar-Infused Options: Adds an extra layer of durability against scratches and impacts.
- Custom Colors: Can be applied in any color, including custom olive green shades.
Learn more about their products at Scorpion Coatings.
Conclusion
Choosing the right paint for your off-road truck is essential for style and functionality. Brands like Krylon COLORmaxx, Eastwood, Custom Shop, and Scorpion Coatings offer excellent options that combine durability with appealing colors, including olive green. This selection allows off-road enthusiasts to achieve the rugged, bold aesthetic they desire while ensuring the longevity and protection of their vehicles.
If you’re thinking about upgrading your truck’s paint or coating, now is the time to make an informed decision. For additional tips on truck modifications, visit dirtantrucks.com.
Common Mistakes to Avoid When Coating Your Truck
Coating your off-road truck can be an exhilarating DIY project, but it’s riddled with potential pitfalls that could compromise your efforts. To achieve that rugged, olive green finish you crave, be aware of the following common mistakes and practical solutions:
1. Inadequate Surface Preparation
One of the most critical steps in the coating process is preparing the surface. Enthusiasts often overlook this, leading to poor adhesion and a flawed finish.
- Solution: Thoroughly clean, sand, and prime the truck’s surface before application. Remove any rust, dirt, or grease. This not only ensures a smooth finish but also prolongs the coating’s lifespan.
2. Using Incorrect Coating Products
Using inferior paints or coatings can lead to disastrous results, such as chips and peeling. Truck owners often get swayed by price without considering product quality.
- Solution: Invest in high-quality, automotive-grade paints specifically designed for trucks that can withstand off-road conditions. Research products and read reviews before making a choice.
3. Improper Application Techniques
Another common mistake is how the coating is applied. Enthusiasts may apply too thickly or not evenly, resulting in runs or streaks.
- Solution: Follow the manufacturer’s guidelines regarding application techniques like spraying distance and angle. Use consistent, overlapping strokes to achieve an even coat.
4. Ignoring Environmental Conditions
Many newcomers underestimate the impact of environmental factors on the coating process. Temperature and humidity can drastically affect drying time and adhesion.
- Solution: Aim to coat your truck in optimal weather conditions-ideally, a dry day at moderate temperatures. Avoid painted surfaces exposed to rain or humidity until fully cured.
5. Failing to Test
Skipping tests can often lead to unintended reactions between the truck’s surface and the new coat. This is a mistake many enthusiasts regret too late.
- Solution: Apply a small amount of the coating to an inconspicuous area first. Monitor for any adverse reactions or incompatibilities before proceeding with the entire coat.
By steering clear of these common mistakes, you can ensure a successful finish on your off-road truck. For a deeper dive into trucking maintenance and practices, don’t hesitate to check out Mastering Diesel Mechanics for tips that can enhance your overall truck experience.
Inspirational Quote for Off-Road Enthusiasts
“Every off-road vehicle tells a story. Customization is not just about looks; it’s about enhancing performance and personal expression. It’s your journey, make it uniquely yours!” – Anonymous Off-Road Expert
Incorporating such sentiments into your vehicle customization process can truly inspire you and others to embrace the rugged spirit of off-roading.
Learn more about must-have features for customizing your trucks
Environmental Impact of Different Paint Types
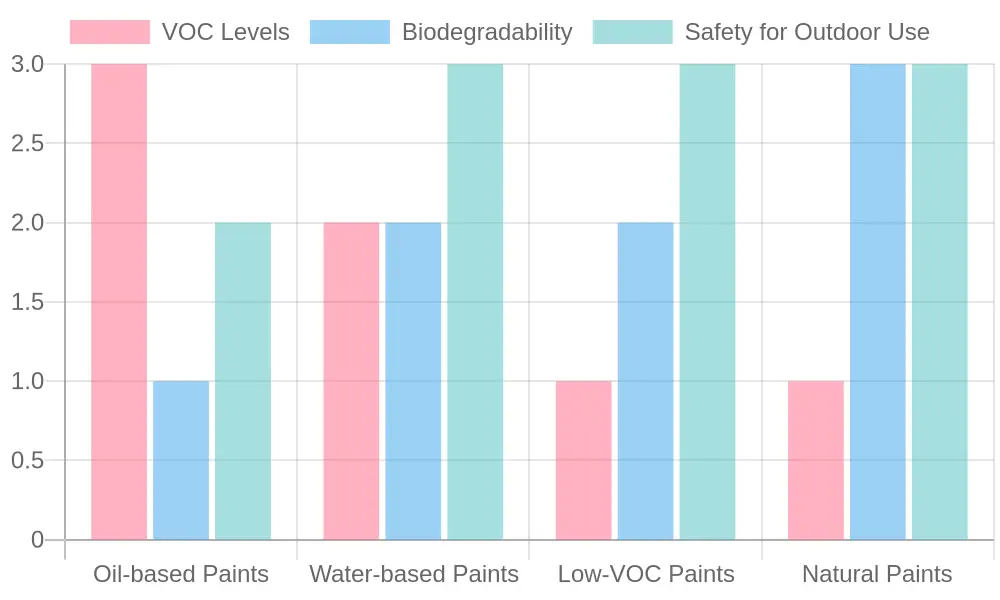
When it comes to painting your off-road truck, it’s essential to consider not just the aesthetics but also the environmental impact of the paint you’re using. Below is a comparison of various paint types based on their VOC levels, biodegradability, and safety for outdoor use.
Comparison Chart
| Paint Type | VOC Levels | Biodegradability | Safety for Outdoor Use |
|---|---|---|---|
| Oil-based Paints | High | Low | Medium |
| Water-based Paints | Medium | Medium | High |
| Low-VOC Paints | Low | Medium | High |
| Natural Paints | Low | High | High |
Key Takeaways
- Oil-based Paints: High VOC levels make them less favorable for environmental safety. They are less biodegradable, posing risks to ecosystems.
- Water-based Paints: A balanced option with moderate VOCs and good safety for outdoor usage.
- Low-VOC Paints: Ideal for minimizing environmental impact while still providing durable coatings with moderate safety and biodegradability.
- Natural Paints: The best option in terms of safety and environmental impact, as they are low in VOCs and highly biodegradable.
For further information on environmentally sustainable practices, consider checking out this overview by the EPA on volatile organic compounds.
Conclusion
Coating your off-road truck in olive green is not just a matter of style; it’s about forging an identity that resonates with adventure, ruggedness, and the great outdoors. As enthusiasts, we understand the bond between a vehicle and its driver, and how personalization can elevate that connection. A well-coated truck stands out not only for its appearance but also for its resilience against the elements, providing protection that keeps you on the trails longer and in better shape.
Now, the question beckons: are you ready to take the plunge and coat your truck? Making this modification can significantly enhance your vehicle’s aesthetic appeal and longevity. Whether you’re carving through mud, sand, or rocky terrains, your olive green truck will be a testament to your adventurous spirit.
But beyond the coating itself, the world of customization offers endless possibilities. Consider how Summit Fairings can assist in sculpting your truck into a masterpiece tailored to your tastes and needs. Their expertise in design and quality ensures that your vehicle not only looks great but stands out, making a statement wherever you go. From custom fenders to sleek body kits, Summit Fairings provides the tools necessary to make your vision a reality.
Take Action Today!
Don’t let your truck blend into the background. Dive into the personalization journey and explore how a fresh coat of olive green can transform your off-roading experience. Partner with Summit Fairings today and start customizing your ride to fit your adventurous lifestyle.
Embrace this opportunity to make your mark on the trails – because life is too short for an ordinary truck. Start now, and let every mile you conquer be a story worth telling!